1993: Sphere Study

If you study drawing, you do a lot of basic studies. Drawing a sphere is a classic study, you must get the lighting and shadows right in order to portray the volume convincingly. But studies can be terribly boring, so you try something different. Anything different. 
I did a lot of studies like this when I was doing a portraiture project, I’ve posted other drawings from this series and you can probably see what I was working out. This was a particularly good, rough, scribbly sketch, from early in the series. This 9 inch square drawing looks like chalk or charcoal, it’s old and starting to get smeared and a little soft, but the whole drawing was soft and smeary to start with. 

Sphere-charcoal.jpg

1977: Color Transfer

I found a cache of my ancient artwork from the 1970s, when I was an art student. I’ve been scanning and posting a few of them. I thought this was an interesting piece of collage, it’s a “color transfer” Solvent is applied to magazine photos, the photo is placed against the paper, and the back of the photo is burnished to transfer the image. I think in this one, the solvent was acrylic medium. It has a beautiful texture and the colors are fairly strong. Color transfers tend to have weak, transparent colors, it’s hard to transfer much of the ink.

Astronaut-color-transfer.jpg

I found several of these prints, but this is the only one small enough to fit on my scanner, it’s about 8 inches square. I might post the other images later if I can get a good reproduction. These seem to be hard to capture.

I remember fiddling with color transfer a bit, sometime around ’77. This is what we used to do when we didn’t have photoshop. It is kind of like monoprinting, but you just have magazine photos as your source. You can manipulate the texture and depth of the transfer, but it’s pretty random. I guess we thought we were all Rauschenbergs, he used color transfer, but he had a professional printmaking atelier to do them properly. This color transfer process was popular around the printmaking department at the U of Iowa, it was so cheap and easy that a lot of students worked with it. But now it’s pretty much a lost art.

1976: Life Drawing 202

Sometimes when people scoff at my draftsmanship and drawing ability, I need some evidence to show that I actually have some talent. Usually the person scoffing is me, artists are their own harshest critics. I recently found a nice “academic drawing” of the type I usually avoided because it was so difficult. I drew this probably sometime late in my sophomore year, near the end of two years of life drawing classes. The pencil drawing is so faint that it was nearly impossible to photograph, so be sure to click on the pic and an enlargement will pop up.

PencilDrawingNude.jpg

1974: My First Gig

I discovered a copy of my very first commercial gig in graphic design, produced when I was 16 years old. My older sister had a college radio show at WHPK, she came back home for winter break and commissioned me to produce a low budget poster. I put this poster together using the pasteup equipment at my high school newspaper. The remarkable thing about this poster is that it was all done by hand on a paste-up board, no computers, no digital typesetting. You can click on the poster to see a larger image pop up.

WHPK-Poster-Large.jpg

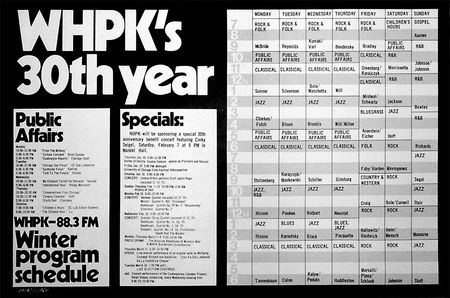
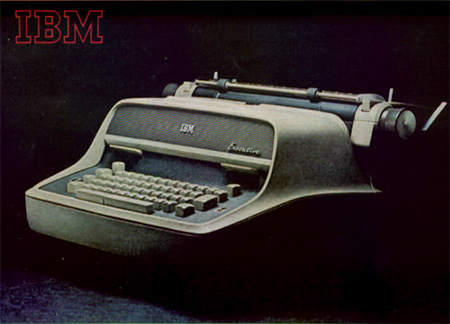
This poster was produced using Chartpak type, rolls of tiny “hairline” tape, wax adhesive, some darkroom work, and an IBM Model C Executive typewriter. The Model C was a wonderful typewriter, it could do proportional spacing and if you used a carbon ribbon, it had almost typeset quality. Almost. Someone donated an old beat up Model C to our school, it was obsoleted when the Selectric was released. Our Model C’s output was sometimes shaky, but it was the best we could get for free. I had a hard time finding a decent pic of the old Model C Executive, it was released in 1959 so it’s way before the internet. 
IBM-Model-C-Exec-Typewriter.jpg
The Model C’s typesetting could be frustrating, particularly since it didn’t have very good vertical precision. The sorts of things the Model C did would be intolerable to anyone using modern computer design programs. Here’s a good example. I scanned a closeup of the schedule, you can see how hard it was to align the type and have consistent leading (the vertical space between lines).
Leading.jpg
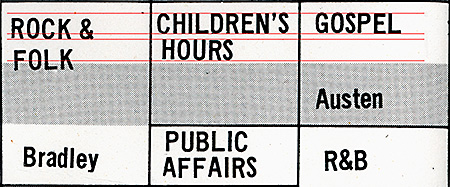
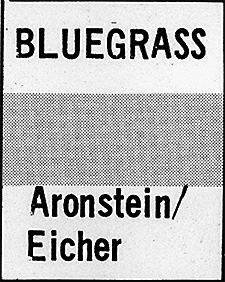
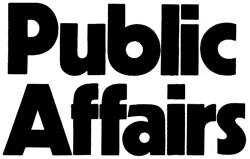
I marked the correct type baselines in red, you can see how “ROCK & FOLK” does not line up right. Even the best typesetting (in the “Children’s Hour”) is kind of shaky, with a slight slant. Some of this type is slightly crooked because it was cut out and glued in place. This is how the grid system started, you had to lay down small pieces of type into a layout and everything would be hopelessly out of alignment if you didn’t line everything up on the grid. But even crooked type can be made worse, the letters in the word “Bradley” keep getting lower and lower, it looks like the paper was slipping in the typewriter. And the A in Public Affairs is chipped off. Sometimes the letters would flake off, the carbon ribbon printing was very delicate. We worked for hours over these pasteups, moving things around and reworking them. It’s a miracle things stay lined up at all.
But I’m not taking responsibility for the poor type even though this is my poster, I think my sister did most of the typing while I worked on the headline type and layout. So I’ll get even with her and release a skeleton from her closet: she had a bluegrass music college radio show. Today, she will deny she ever had any interest in bluegrass music and was an avid bluegrass musician. But I have the evidence.
WHPK-Bluegrass-with-Carol.jpg
You can see another common layout problem in the upper left corner of that box, the corner is open. All the lines were produced with rolls of Chartpak Graphic Tape. This is hairline width, I think it’s 0.25 points. The tiny tapes were terribly difficult to work with, you had to stretch the tapes over the layout board, align it to the faint blue grid lines, carefully press them into the paper, and cut the ends with an X-Acto knife. Corners were especially difficult. If the layout board was mishandled, the tapes could pull apart and leave open corners.
But enough about the problems, there are some good features to this design as well. The headlines in Kabel Bold type were all done by hand with Chartpak “rub-on” transfer type. The letters came on plastic sheets, you moved the sheet into position on paper and rubbed the plastic sheet with a blunt tip “burnisher” to transfer the letter onto your paper. It was hard to make good rub-on type, but this is an excellent job. Wow, look at that tight kerning! And it was all done by eye.
WHPK-Public-Affairs.jpg
I liked to put the type on clear acetate and then enlarge it in the darkroom. I could enlarge type to whatever size I needed, even advanced phototypesetting came only in fixed sizes. Nowadays we take resizing type for granted, we just use the computer and drag the type block until it’s the size we want. But back in the 1970s, that meant printing on photo paper in a darkroom and developing it in trays of chemicals.

WHPK-Zebras.jpgThe core idea of this poster was a chronological layout, using gray stripes to guide the eye across the grid. Today this design is known as “zebra stripes,” it’s very common, it is even used on computer screens to display long file lists. I got the idea from “green bar” computer paper, it had green zebra stripes to guide your eyes across 14 inch wide paper.

We called the little graphic device on the left a “puppy.” I made design elements like this for our high school newspaper. One day I gave my finished artwork to a guy working on the newspaper layout and he said, “slap that puppy on there!” So that name kind of stuck to it.
But I digress. That artwork is deceptively complex, it had to be produced on 3 different layout sheets. Each sheet had to align precisely with the others and you could not see how it would look until the layers of artwork were etched into a printing plate. 
The dark bars and dark numbers were laid out on one sheet. Then a second sheet was an overlay with the type that would be “knocked out,” putting the white type in the dark bars. The camera operator who turned this artwork into a printing plate had several steps to perform. The layers were photographed on separate negatives at full size. Then the films were overlaid and the numbers “subtracted” from the bars on the other sheet, and halftone dots added to make it gray. Then that negative was positioned on the main poster design on the third layout sheet. That sounds like a lot of work, it was, but we did this all the time with manual layouts. So when you use Photoshop and you see confusing commands like “Subtract Layer,” this is where that stuff all came from. It was standard graphic arts technique.
The final step was to print the poster. I used the local print shop that we used for our high school newspaper. They had a beautiful Miele sheet-fed offset press that was probably manufactured in the 1920s. The poster was designed to fit exactly twice in the maximum paper size of this press, so the sheets could be chopped in half. I picked a glossy,
stiff poster paper for this job.
I went back to the print shop to see if the printing plates worked as I had designed them. Surprisingly, they had already printed the whole job, but on the wrong paper, on the wrong press. But the posters looked great, I took one sheet as a proof. They printed on much larger sheets on a more expensive press than I could afford, they upgraded my job for free. But the larger press used bigger sheets of paper, that’s why I targeted the smaller press. Now the posters had large white edges that would all have to be chopped off, 5 precise cuts in the big cutting machine instead of one. I didn’t care much about that, they didn’t charge extra for the cutting, but it was just another step where errors could occur. I loved the thick, matte paper they used, I told them to not reprint the job on the right paper, I’d take the job as-is. But when I came back the next day, they had reprinted the whole job on the glossy paper and discarded the matte version. So this press proof is the only remaining matte version.
The final press run was printed, cut, and wrapped in brown butcher-paper bundles. The whole job was a stack of paper about two feet high. It was amazingly heavy. I loaded the bundles into my sister’s trunk so she could drive them back to college, I could see the rear end of her car sag slightly under the weight. She told me that everyone at WHPK loved the poster. I suspected they liked it mostly because the design was so elaborate for such a low budget. Most of the money went to the printer. I can’t remember the exact budget, but I vaguely recall the printing cost about $100 and I think I made about $25 for myself. The cost of materials couldn’t be more than about $3, but I don’t recall exactly.
Well that was quite a trip down memory lane. It is amazing how much I remember about this specific job, considering it was 37 years ago. And then I realize, I’ve been working in print and design for over 37 years! I often think about how many obscure technical skills were required to manually produce these projects, and how those tools and methods are considered a lost art in the modern digital design world. But these primitive skills were the foundation of my lifetime career in graphic design and printing. 
Printing and design has changed so much over the years, but I can never really get far from my roots. Coincidentally, I now live next door to the old print shop site. They disbanded long ago, now it’s a hardware store. I am writing this article about 150 feet from where this poster was printed.

Blizzard 2/1/2011

Iowa City had a severe blizzard last night, at least 15 inches of snow and 40 mph winds. The National Guard has been mobilized to handle a snow emergency. I always get stuck in my parking lot when it snows like this, and it can take a couple of days for the plow to dig us out. When the storm was over, this is what I saw.


snowdrifts.jpg


The wind was at just the right angle to blow the snowdrifts away from my car. Everyone else is buried 4 feet deep.


Update: The plow finally dug us out on Feb 4, three days after the blizzard.


1975: 3M VQC Copier Art

The photocopier was invented for graphic arts, so when great technical improvements occurred in the 1960s and 70s, artists were immediately attracted to copiers as a graphic arts medium. One of the pioneers of copier art was Wallace Berman, he worked with a wet process known as Verifax. Berman’s work was influential, but complex wet processes are barely an improvement over photo darkroom processes. 
Copiers were designed for reproducing text or line drawings, the high contrast copies made it difficult to reproduce photographs or continuous tone artwork. But in the 1970s, a photographic quality copier was in widely distributed, the 3M VQC Copier. Artists loved it, a coin operated VQC copier was available at a local public library, artists like me lined up to use it for hours at a time. 
One of the great features of the VQC is that you could run copies through multiple times, overlaying images. Each pass through the copier had a different tonal quality, and you could change copier settings for more effects. You could also draw on the copier paper with markers or silverpoint before printing on it, the copier toner would not adhere to the drawing. Direct manipulation of the copy process was easy, but the results were unpredictable. 
Here’s an image I made sometime around 1975. It’s a copy of a bold graphic poster from Japan, run through the copier twice. The second impression is gray, offset from the first. If this artwork turned out well, it was probably because of the graphic artist who made the original poster.

CopierArt1975.gif

Copier art was a revolutionary technique in modern mechanical reproduction. Some graphic artists started using copiers to enlarge images, rather than using projector systems like the Lucygraph. Some artists even turned copiers on their side and used them as cameras, foreshadowing the digital camera. But in the Postmodernist aesthetic, copiers were used to produce flat images, reducing the world to two dimensions, stamped out repetitively.
Here’s another copier artwork I made. It’s taken directly from the VQC copier repairman’s test image. This is just an intermediate stage of preparation for the final artwork, made by cutting up copies and gluing them together. You can see the image is produced with halftone dots, It’s line art so it’s not really photographic and not much of a challenge for the VQC. But it’s easy to chop up any old image and change the meaning by multiplying it. You might be able to tell the eyes on the left have more detail than the eyes on the right (a second generation copy). You could manipulate detail and add noise by making multiple generations. 
CopierArt1975.gif 
Here’s the final artwork, run through the copier over and over, in different orientations. Each generation added more grainy noise. I thought this gave the final print some richness that was lacking in the original line art.
CopierArt1975.gif
Each of these images are the width of a sheet of copier paper. I wish I could reproduce them larger, so you could see the rich detail, but alas, I can only provide thumbnails, to prevent my images from being pirated. Note that these images (like all original content on my blog) are copyrighted: Copyright © Charles Eicher 1975-2011.
It wasn’t a great leap from the copier artists of the 1970s to the desktop publishing revolution of the 1980s. But perhaps some of the fun went out of the medium. LaserWriters with digital input always gave you the exact, precise results. You never knew quite what you were going to get with the old analog copiers like the VQC. 

1976: Life Drawing 101

I was going through some folios of old artwork and found this little sketch from my oldest Life Drawing classes. This must date to around 1976. I was a total rookie at drawing, this is kind of embarrassing, but I can see some good qualities here. This sort of artwork would be considered “juvenilia,” work done as a young artist who hadn’t quite figured out what he’s doing.

Nude-in-Wicker-Chair.jpg

Now obviously I’m struggling here with the proportions of the leg, there are some erasures and I probably had it better before I erased it. The leg and torso are presented flat in the picture plane, so I did have some sort of idea of what I was trying to do with this drawing. The left leg also has problems, but it is shaded in a way that pushes it back from the picture plane. You can see it took me a couple of tries to get the round shape of the wicker chair, but it’s shaded rather nicely. There are two or three different pencil hardnesses in use here.

But I am rather more pleased with the torso and shoulder, the proportions are right and it forms the front plane with the leg. It’s hard to indicate the roundness of forms when you draw in these sketchy strokes, executed so rapidly. But the sketchy strokes work well when just suggesting the shape of a shoulder blade, the shadow under the upper arm, or the shape of the hips and buttocks. The round curves in the back of the chair pull the picture inward, while the square front of the chair helps establish the front plane of the model.

The problem with this sort of life drawing is that the poses are only a few minutes, so you don’t have time to work everything out. The classes are designed to help you work out your issues with proportion and lighting, but you can only work on a couple of things in a single drawing. It’s almost impossible to get it all right.

This drawing is about six inches across, in the corner of a large 18 x 24 inch sheet of paper. The full page is taken up by an unfinished sketch in large, rough, black chalk, working out the composition. It is obviously abandoned but has the same composition as the sketch. I can tell I did a quick chalk sketch but didn’t like it, and didn’t want to waste the whole sheet of paper, so I did this little sketch in the corner.

I am not an artist with natural draftsmanship skills, it’s hard work developing those skills. I still have poor draftsmanship, which is pathetic because I have a BFA degree in Drawing and Painting. Obviously being unable to draw well is not an obstacle to an art degree in Drawing. I recently did some Life Drawing studio sessions and I can tell I still struggle with the same problems of body proportion and how to convincingly portray it. Now I have other qualities that help my drawing rise above the level of just another poor draftsman, and I can see some faint impressions of my current drawing methods in this old drawing. That’s why artists sometimes keep juvenilia, to compare it to their current work, and see where they came from.

It’s interesting to compare to what other work I was doing in art school at that time. I might have been at the cutting edge of computer graphics at the time, but I still had to take the basic Life Drawing classes, like every art student. Today, every art student wants to do computer graphics, but I’ve done that. Now I’d rather do Life Drawing.

Body Temperature

Last winter, I caught the Swine Flu, I was sick for a whole month. I went to the doctor, they took my temperature, it was 96.5F. I didn’t know your body temp could drop like that, I asked the doctor about it, he said, “it’s within a normal range.” Ever since then, my average normal body temperature has been 96.5F.
This winter, I caught a terrible cold, I’ve been sick for over a month. I went to the doctor, my body temperature was recorded at 93.5F! I thought any body temp that low meant the time of death was within the last 4 hours. At one point, I had a terrible fever, my temp shot up to 97.5, I felt like I had a fever of 104. But I must be getting better, my temp has stabilized back to 96.5.
Next winter, I hope I don’t get a cold like this. I don’t know how much lower my body temperature can get. I’m already at the edge of hypothermia.

Sox 3, Charles 0

I have a problem with socks. I have a problem with women and socks. I remember once I was doing the laundry and I found a lost sock. It was a little women’s footie, I thought maybe my girlfriend left it behind, it was the kind of socks she wore when working out.

So the next time she came over, I gave her the sock. She looked at it and was immediately enraged. She said, “This isn’t my sock. It must be your other girlfriend’s sock,” and she stormed out the front door. I was stunned, I had plenty enough problems with this one girlfriend, I sure didn’t have (or need) another one. But she was convinced another woman left it at my house, and she wouldn’t speak to me for a whole month. The sock’s original owner is unknown. I can only guess that it was left behind in a dryer in the laundromat, then I threw my laundry in that dryer.

That was years ago, but I’ve had some recent sock problems too. A woman friend came over last winter on a cold, wet day. She asked if I had any dry socks. I gave her one of my best pairs of socks. I had two identical pairs of my warmest socks, big thick black woolen winter socks, I wore one pair and she wore the other. She wore them home and I never got them back.

Now the other pair of black woolly socks is gone too, thieved by another woman. Another friend came over and threw her jacket down on the floor by my shoes and socks. For reasons I will never figure out, she took my socks when she picked up her jacket and left. I asked her about it, she said, “oops, I just swept up my jacket and stuff and I guess I grabbed your socks too.” I demanded the return of my favorite socks. She said it was too late, she was doing laundry for someone else and gave my socks to them. No getting them back. Now I have no good winter socks at all. And someone else is now wondering where the hell this pair of rogue socks came from.

Update: Sox 3, Charles 1. I found a third pair of my favorite black socks. So now I have the one pair left.

© Copyright 2016 Charles Eicher