The most inscrutable feature of Photoshop has got to be the unsharp mask filter. I’ve worked hard to study it and understand its functions, and I’ve tried to explain it to people and they positively do not understand. And probably that’s because I still do not fully understand it. It’s only natural, it’s a horribly complex trick cooked up by darkroom geeks that think in layers of film. I always tell people it’s not unsharp mask, it’s mask unsharp. You are doing a blur and then masking the unsharp pixels. Subtract that mask layer back out of the image, and you’ve done a very complex image transform, it heightens contrast only along the edges and tonal transitions that are most suceptible to degradation from blur. It sharpens and increases contrast only where it is needed. That’s what confuses people, they think it’s an unsharp mask, so it unsharpens. Like I said, you’re masking out the unsharp.
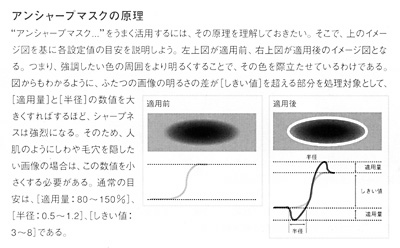
Here’s a footnote I ran across in a new Japanese design magazine. This is absolutely the most dense and descriptive explanation of unsharp mask I’ve ever seen, and to add to the density, it’s full of difficult jargon expressed in kanji. But the curves tell the story (I’ll help a bit).
The left image is a black dot that has been blurred, it’s a regular old Gaussian blur. You see the greyscale curve underneath. The amount of Gaussian blur is the radius you see in the PS filter settings, it’s the radius of the blur effect. Now look a the image on the right. All those pixels that were blurred are now represented by the white ring, that is the mask. You can see the mask curve, it changes almost nothing in the midtones of the curve, but is amplified only along the transitional tones of the curve that changed during the blur. You get more contrast without messing up the midtone relationships in the image. There are horizontal clipping levels drawn across the top and bottom of the mask curve that clip the masked tones back into the same levels as the original curve. It’s a very strange image transfer function, I’ve seen this function explained with calculus using derivatives and integration, and my head just about exploded.
This math is a reproduction of an old analog process. Photographers used to make negative masks by contact printing the negative onto a new sheet of film. Direct contact between the neg and film makes a sharp mask. But if you put a clear sheet of acetate between the neg and the film, the gap will make the contact print blurred. The more sheets of film, the thicker the gap, the more blur is produced. The exposed and developed film is the unsharp mask. Sandwich it with the original negative, put the sandwich in an enlarger and print it, the final print is unsharp masked. It was a difficult process because you had to keep the layers precisely aligned in registration. It’s hard to keep little pieces of film aligned perfectly. Now you can do it with the poke of a button.
I’m still translating and pondering some details, but I learned a few tricks from that demo already. I even did a nice unsharp mask to this image, it held the tiny kanji pretty well, it’s about the best I’ve ever done. Japanese design magazines are just crammed with these great tips, this Fair Use sample is just a footnote.
